
The control starts up in Incremental jog mode. In order to jog the axes in continuous movement, you need to press the INCR/CONT key to switch from incremental to continuous jog mode.
The Machine Home position is fully X- (bridge to rear), Y- (carriage to left) and Z+ (head up).
|
The control starts up in Incremental jog mode. In order to jog the axes in continuous movement, you need to press the INCR/CONT key to switch from incremental to continuous jog mode. |
You can control the ultrasonic generator manually with jog panel keys, or automatically with program codes. The keys and codes are those which would ordinarily control the spindle of a CNC milling machine or router.
The ultrasonic generator can operate at variable amplitude, ranging from 20% to 100% of the generator's maximum amplitude.
"Spindle" control must be in Auto mode in order to use programmed M and S codes. "Spindle" control must be in Manual mode in order to use the jog panel keys.
 |
Switch between Auto and Manual control modes. |
In manual mode, you can control operation with these keys:
 |
Start Ultrasonic Generator |
 |
Stop Ultrasonic Generator |
In Auto mode, you can control operation and direction with these codes:
| M3 | Start ultrasonic generator |
| M5 | Stop ultrasonic generator |
| Snnn | Set amplitude to nnn% |
In either mode, you can further control amplitude with these keys:
 |
Increase amplitude |
 |
Set amplitude to programmed amplitude (Auto mode) or to 50% (Manual mode) |
 |
Decrease amplitude |
The vacuum system can be operated with automatic M functions or via the operator panel, as follows:
| M61 | Vacuum Zone #1 On |
| M62 | Vacuum Zone #2 On |
| M71 | Vacuum Zone #1 Off |
| M72 | Vacuum Zone #2 Off |
 | Vacuum Zone #1 On/Off |
 | Vacuum Zone #2 On/Off |
The control will automatically start the vacuum pump whenever any zone is turned on, and will automatically stop the vacuum pump when all zones are turned off
The C axis part zero must be set so that at zero degrees the blade is aligned with X axis travel.
The control system can automatically align and set the C axis position, using an optical gap sensor on the left end of the bridge.
| M43 | Align and set C0 |
 |
The C axis is programmed in degrees of rotation. While cutting parts, the CNC program must call out the correct angle on the C axis to keep the blade aligned with the cut.
C axis positions progress continuously. For example, if you are moving in the 350° direction, and you are going to turn 20° to the left (CCW), then the next C position would be 370°. If you called for 10° instead, then C would rotate back around clockwise, 340°.
As a result of this, a program which cuts several closed shapes, all in the same general direction, will end up with the C axis several turns away from zero.
If the next program cycle begins by positioning C somewhere between 0 and 90, then the axis would have to return back around multiple turns to get there.
To avoid this, use an M53 code or the Aux9 key to re-zero the C axis near its current position. For example, if C is at 740°, then after executing an M53 reset code, the C position will show 20°.
Due to a limitation in the Centroid control software, M53 should be programmed at the end of a CNC job, or run by itself at the MDI prompt or via the Aux9 key. M53 should not be programmed at the beginning of a CNC job.
| M53 | Reset/Unwind C Axis Position |
 |
The printer will generally be controlled via CNC macro calls.
Three macros are called from a CNC program for printer control:
| ReadMessages.cnc | Send all message text from this CNC program to the printer |
| Print.cnc | Print a block of text |
| Rosette.cnc | Draw a rosette (arrow) |
The CNC program must call ReadMessages.cnc before any other printing commands.
There are no parameters. The call is simply
G65 "ReadMessages.cnc"
This will call an external program (ReadTextFromCNC.exe) to scan through the CNC job file, find all the calls to Print.cnc and Rosette.cnc, extract the associated text to print, and transmit that text to the printer.
The CNC program should provide for a minimum of 10 seconds between the ReadMessages.cnc call and the first call to Print.cnc or Rosette.cnc. This will ensure that all messages have been stored in the printer buffer, and that the printer is back on line and ready to receive print commands.
Usually, there will be more than 10 seconds worth of cutting motions in the program prior to any printing, and so this is not an issue. However, if you write a program that does nothing but print (with no cutting moves) then you should insert a "G4 P10" code to force the necessary pause.
The CNC program should call Print.cnc any time it wants to print a block of text. A block of text may contain between one and three lines.
The Print.cnc call must specify the XY location and the angle (direction). The text itself must appear at the end of the G65 call, set apart with a semi-colon. The semi-colon makes the text a comment, invisible to the CNC processor, but still visible to the ReadMessages feature.
In a multi-line text block, the lines are separated with additional semi-colon characters. It is not possible to print a semi-colon as part of the text.
Examples:
G65 "Print.cnc" X1 Y2 A0 ; One line of text at 0°
G65 "Print.cnc" X1 Y4 A45 ; First line of text at 45°;Second line
G65 "Print.cnc" X8 Y1 A90 ; First line at 90 degrees;Second line;Third line
G65 "Print.cnc" X4 Y8 A180 ; Reversed line of text at 180 degrees
The CNC program may call Rosette.cnc to print a standard rosette (orientation arrow).
This call is nearly identical to Print.cnc above, except that there is no accompanying text. Instead the system will print a standard arrow symbol in the specified location, angle, and orientation.
Examples:
G65 "Rosette.cnc" X2 Y2 A0 ; (points right)
G65 "Rosette.cnc" X4 Y7 A45 ; (points up and right)
G65 "Rosette.cnc" X9 Y1 A90 ; (points up)
G65 "Rosette.cnc" X5 Y6 A180 ; (points left)
The 'A' parameter to Print.cnc and Rosette.cnc gives the angle of the text or arrow, in degrees. It should be between -180 and +180.
 |
 |
| Print.cnc text direction | Rosette.cnc arrow direction |
Internally, Print.cnc and Rosette.cnc are identical.
Each one positions the X, Y, Z and A axes at the starting location; lowers the print head; sends a trigger signal to the printer; moves along the printing path; and raises the print head. They are only named differently so that the message-queuing utility can tell whether to use provided text elements, or to use a standard arrow symbol.
Both macros rely on several Centroid Machine Parameter values for their operation:
| Parameter | Meaning |
|---|---|
| 962 | Feedrate (line speed) during printing (in/min) |
| 963 | Z height (throw distance) |
| 971 | X offset from print head to cutter blade |
| 972 | Y offset from print head to cutter blade |
| 973 | Z offset from print head to cutter blade |
Do not reduce Parameter 963 to less than about 0.50". The ultrasonic cutter blade sits lower than the print head, even when the print head is extended. If you try to get the print head too close to the surface, you will hit the surface with the cutter blade and damage both the part and the blade.
Set Parameter 962 to match the Line Speed that is entered in the printer's System Set-Up screen, taking care to convert between feet/minute (in the printer) and inches/minute (in the Centroid control).
ReadTextFromCNC.exe is a Windows (.NET) console-mode program which identifies all the printed text blocks and rosettes in the current CNC job, and transmits them over the network cable to the printer.
It is called once at the beginning of each CNC job, so that the messages for that job are queued in the printer, ready to print.
StartPrint.exe is a Windows (.NET) console-mode program which sends a single "Trigger Printer Message" (a.k.a. "Product Detect") signal over the network cable to the printer.
It is called from the Print.cnc and Rosette.cnc macros each time one text block or arrow needs to be printed.
Both utilities use the file PrinterConfig.txt for the IP Address and port number of the printer. If for some reason the IP Address of the printer is changed, edit PrinterConfig.txt to specify the correct IP address and port number. As of 1/11/2018 that file contains:
192.168.0.1
3000
If the IP Address of the printer is changed, it is likely you will also need to change the (static) IP address and subnet mask for adapter "Ethernet 2", which is the Manhattan/ASIX USB-to-ethernet adapter installed in the console.
The static IP address and subnet mask are on the IPv4 Properties page, under Control Panel → Network and Internet → Network Connections.
The IP address for the "Ethernet 2" adapter should be on the same network as the printer, but should have a different final address. As of 1/11/2018 the "Ethernet 2" IP address is 192.168.0.2.
The print head can be lowered and raised with M functions, as follows:
| M31 | Lower print head |
| M32 | Raise print head |
In normal operation, the Auxiliary keys on the jog panel have the following functions:
|
Vacuum Zone #1 On/Off |
|
Vacuum Zone #2 On/Off |
 |
No function |
 |
No function |  |
No function |  |
No function |
|
Align C Axis |  |
No function | |
Reset/Unwind C Axis Position |
| Aux10 | No function | Aux11 | No function | Aux12 | No function |
| Aux13 | No function | Aux14 | Maintenance Mode On/Off |
| M0 | Stop (wait for Cycle Start) |
| M1 | Optional Stop (wait for Cycle Start) |
| M2 | Program Restart (with wait for Cycle Start) |
| M3 | Ultrasonic On |
| M5 | Ultrasonic Off |
| M26 | Set Axis Home (only used in machine homing macro) |
| M43 | Align and set C0 |
| M53 | Reset/Unwind C Axis Position |
M functions M91 and above are used internally in custom macro programs, but are generally not used directly in user machining programs.
See Chapter 13 of the Centroid M-Series Operator's Manual for descriptions of the higher-numbered M functions.
The PLC program can generate several fault, error and warning messages, in addition to those listed in the Centroid operator's manual.
You can use the PLC Diagnostic display on the console to view some of the Centroid PLC input and memory locations mentioned with these fault and error conditions. At the control's main screen, press Alt-I to activate the PLC Diagnostic display. Press Alt-I again to dismiss it.
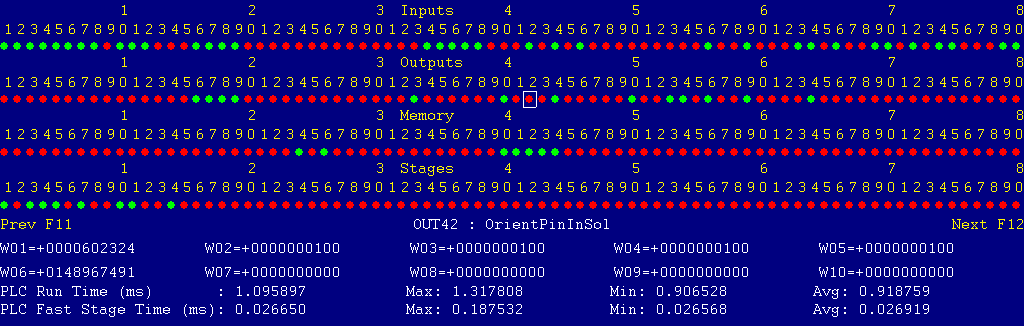
Each page of the Diagnostic display shows four rows of red and green dots: the first row shows PLC inputs 1 through 80; the second row PLC outputs 1 through 80; the third row PLC memory bits 1 through 80; and the fourth row PLC program stages 1 through 80.
You can use the arrow keys to move a highlight box over any of these locations. The name of the highlighted location will be displayed in the center of the screen below the red and green dots.
For example, in the illustration above the highlight box is on Output #42: The dot below the 2, to the right of the superscript 4, on the second line.
Below the four rows of bit status information are ten numeric ("word") variable values, labeled W1 through W10. Some of these variables also hold useful status information, described with the error and fault conditions to follow.
There are multiple pages of Diagnostic data. With the Alt-I diagnostic display showing, you can use the F12 and F11 keys to scroll right and left. For example, pressing F12 once will shift to the page showing inputs and outputs 81 through 160, and word variables W11 through W20.
Messages with 9000-series message numbers are Faults. After resolving the problem, you must press and release the Emergency Stop button to clear a Fault.
Messages with 8000-series message numbers are Errors. Errors will cancel the program cycle and stop the spindle and coolant, but they do not then need to be explicitly reset.
Messages with 5000-series and 2000-series message numbers are Warnings and Informational Messages. They do not cancel the cycle or require any action to reset.
The control detected an internal error in processing the PLC logic program.
Report this error to your dealer, along with the values from W14 and W15. Also report what function the machine was performing when the fault occurred.
You must shut down and cycle the power to clear this fault.
References:
PLC W14: Copy of internal SV_PLC_FAULT_STATUS, indicating the type of problem
PLC W15: Copy of internal SV_PLC_FAULT_ADDRESS, indicating the location of the problem
The control unit detected loss of communication from the operator panel in the Console.
Check for damage or disturbance to the cable between the console and the Oak control unit in the control cabinet.
Press and release Emergency Stop to clear the fault.
References:
Schematic: Lines 93, 106
The operator panel reported back to the control unit a loss of communication from the control unit. This indicates the return signal from the pendant is functioning normally, but the outgoing signal may have problems.
Check for damage or disturbance to the cable between the console and the Oak control unit in the control cabinet.
Press and release Emergency Stop to clear the fault.
References:
Schematic: Lines 93, 106
You exited the CNCM control software without first pressing Emergency Stop.
Always press Emergency Stop prior to exiting the control software.
Press and release Emergency Stop to clear the fault.
One or more of the servo motors has tripped its thermal sensor, or a motor is disconnected.
Check the actual temperature of each servo motor, and verify that all six motor power cables are secured to the motors.
Allow time for the motor to cool down and reset. Then press and release Emergency Stop to clear the fault.
References:
PLC INP1: indicates monitoring relay (610CR) state.  Green = closed = okay, Red = open = tripped
Schematic: Lines 123, 145
The servo drive power supply module (TVD module) Bb signal is open, indicating a fault in the module.
Check the green and red status LEDs on the TVD module. If no LEDs are lit, then check breaker CB7. If at least the Green +24V/+15V LED is lit, then check the others for a possible cause of the error.
See the Indramat TVD 1.3 Power Supply Module Applications Manual for further troubleshooting information.
Press and release Emergency Stop to clear the fault.
References:
PLC INP2: indicates monitoring relay (612CR) state.  Green = closed = okay, Red = open = tripped
Schematic: Lines 35, 124, 145
The TVD module has input power, but is reporting either low input line voltage or low DC bus (rectifier) voltage.
Check for phase loss or low supply voltage.
See the Indramat TVD 1.3 Power Supply Module Applications Manual for further troubleshooting information.
Press and release Emergency Stop to clear the fault.
References:
PLC INP7: indicates TVD module UD (voltage okay) state.  Green = closed = okay, Red = open = low
Schematic: Lines 35, 148
One of the extreme overtravel switches on the X or Y axis is tripped.
Push the bridge or carriage manually back away from the limit, then press and release Emergency Stop to clear the fault.
References:
PLC INP3: indicates monitoring relay (616CR) state.  Green = closed = okay, Red = open = tripped
Schematic: Lines 125, 146
One of the safety bumpers on the ends of the bridge was bumped.
Verify that the bumpers are clear, then press and release Emergency Stop to clear the fault.
References:
PLC INP5: indicates monitoring relay (620CR) state.  Green = closed = okay, Red = open = tripped
Schematic: Lines 127-131, 147
One of the auxiliary emergency stop buttons, on the ends of the bridge cross-beam, was pressed.
Release the auxiliary emergency stop button(s), then press and release the console Emergency Stop button to clear the fault.
Note that the monitoring relay 638CR will be open if either auxiliary emergency stop button is pressed, and also if the console emergency stop button is pressed. The PLC will only report a 9046 fault if 638CR (INP6) is open, while the console emergency stop button (INP11) is closed.
References:
PLC INP6: indicates monitoring relay (638CR) state.  Green = closed = okay, Red = open = tripped
PLC INP11: indicates console emergency (PB1) state.  Green = closed = okay, Red = open = tripped
Schematic: Lines 132, 147, 150
 The control attempted to enable (power) the C axis, but the tool-change
locking pin is still inserted.
The control attempted to enable (power) the C axis, but the tool-change
locking pin is still inserted.
Pull the release knob to retract the C axis locking pin, and verify that the C axis is free to rotate.
Press and release Emergency Stop to clear the fault.
References:
PLC INP48: indicates lockpin sensor (1228LS) state.  Green = closed = unlocked, Red = open = locked
Schematic: Line 177
The control lost communication with one or more of the PLC I/O expansion boards.
Power down, open the cabinet, and check the connections at both ends of the gray cables which connects H8 - H11 on the Oak unit to H3 on the three PLCADD1616 boards, and to H2 on the ADD4AD4DA board.
Power up and check for green "PLC OK" LED indications on each of the expansion boards.
References:
PLC W36: bitmap of detected PLC expansion boards.  15 = four boards detected
Machine Parameter 900: bitmap of expected PLC expansion boards.  15 = four boards expected
Schematic: Lines 108, 155, 169, 180
The ultrasonic generator is reporting a temperature error (overheat condition), via pin 4 of connector X16.
Check for possible causes. Check the generator housing cooling fans. Allow the unit time to cool down.
Press and release Emergency Stop to clear the fault.
References:
PLC INP35: indicates "TEMP ERR" state.  Green = closed = error, Red = open = normal
Schematic: Lines 29, 171
The ultrasonic generator is reporting a short circuit condition, via pin 7 of connector X16.
See the GFM / Sonotronics Nagel ultrasonic generator manual for further troubleshooting information.
Press and release Emergency Stop to clear the fault.
References:
PLC INP36: indicates "SHRT CKT ERR" state.  Green = closed = error, Red = open = normal
Schematic: Lines 30, 171
The ultrasonic generator is reporting an A-fuse error, via pin 8 of connector X16.
See the GFM / Sonotronics Nagel ultrasonic generator manual for further troubleshooting information.
Replace or reset the fuse, then press and release Emergency Stop to clear the fault.
References:
PLC INP37: indicates "A-FU ERR" state.  Green = closed = error, Red = open = normal
Schematic: Lines 30, 172
The ultrasonic generator is reporting a "wobble" condition, via pin 20 of connector X16.
See the GFM / Sonotronics Nagel ultrasonic generator manual for further troubleshooting information.
This is an error condition which cancels the program cycle and switches off the ultrasonic generator output. No further reset is required.
References:
PLC INP38: indicates "WOBBLE ERR" state.  Green = closed = error, Red = open = normal
Schematic: Lines 31, 172
The ultrasonic head cover (door) is open while a program cycle is active or while the ultrasonic generator is turned on.
Close and latch the head cover, then restart the operation.
This is an error condition which cancels the program cycle and switches off the ultrasonic generator output. No further reset is required.
References:
PLC INP4: indicates monitoring relay (618CR) state.  Green = closed = cover closed, Red = open = cover open
Schematic: Lines 126, 146
The servo power supply (TVD) module reports an impending overload in the regenerative braking circuit.
Reduce feedrates or pause the cycle to allow time for the braking section to cool down.
This is a warning message. No reset action is required.
References:
PLC INP8: indicates TVD module "BVW" state.  Green = closed = okay, Red = open = warning
Schematic: Lines 36, 148
The servo power supply (TVD) module reports an impending overheat condition.
Reduce load or pause the cycle to allow time for the TVD unit to cool down.
This is a warning message. No reset action is required.
References:
PLC INP9: indicates TVD module "TVW" state.  Green = closed = okay, Red = open = warning
Schematic: Lines 36, 149
An operator stepped onto one of the rear safety mats while a program cycle was running and the X axis (bridge) position was over or near the rear of the machine. Motion has been paused (Feed Hold).
Move clear of the machine, then press Cycle Start to resume motion.
References:
Machine Parameter 960: minimum X axis machine position (distance from home)
before an operator is allowed to step onto the rear mats while a program
cycle is running.
PLC INP13: indicates rear mats relay state.  Green = closed = clear, Red = open = weight applied
Schematic: Lines 135, 139, 151
An operator stepped onto one of the front safety mats while a program cycle was running and the X axis (bridge) position was over or near the front of the machine. Motion has been paused (Feed Hold).
Move clear of the machine, then press Cycle Start to resume motion.
References:
Machine Parameter 961: maximum X axis machine position (distance from home)
where an operator is allowed to step onto the front mats while a program
cycle is running.
PLC INP12: indicates rear mats relay state.  Green = closed = clear, Red = open = weight applied
Schematic: Lines 133, 137, 150
The CNC program, in combination with the current Spindle Speed Override setting, has requested an ultrasonic amplitude lower than 20%.
No action is required, but be aware that the generator will be running at the 20% minimum allowed amplitude.
The PLC program requested display of a message on the screen, but the provided message code was not valid.
This indicates an error in the PLC program. Report the message to your dealer, along with the value in PLC variable W16.
References:
PLC W16: stores the invalid message code
The PLC hardware detected the presence of an I/O expansion board, but the setting of Machine Parameter 900 did not tell it to expect that board in the system.
On this machine, there should be four I/O expansion boards installed, and Machine Parameter 900 should be set to 15.0.
References:
PLC W36: bitmap of detected PLC expansion boards.  15 = four boards detected
Machine Parameter 900: bitmap of expected PLC expansion boards.  15 = four boards expected
The program attemped to run an M3 ultrasonic-start code, but the control is still in Manual Spindle (ultrasonic generator) mode.
Press the SPIN AUTO/MAN key in the top row of the operator panel to select Auto mode (LED on); then press CYCLE START to resume program operation.
A previous servo drive fault condition has been resolved, and cleared with Emergency Stop.
A previous PLC fault condition has been resolved, and cleared with Emergency Stop.
You inadvertently pressed a keyboard combination that is used for keyboard jogging controls, but keyboard jogging features have been disabled on this machine.
A previous fault condition has been cleared with Emergency Stop.
The order of the axis drives; order of the axis definitions in the control configuration menus; and order of the axis jogging controls vary. Definitions are as follows:
| Axis | Axis # | Drive # | Drive-Okay Bit | Jog Keys | MPG Position |
|---|---|---|---|---|---|
| X | 1 | 1 | MEM16 | X | 1 (X) |
| Y | 2 | 3 | MEM18 | Y | 2 (Y) |
| Z | 3 | 4 | MEM19 | Z | 3 (Z) |
| U | 4 | 2 | MEM17 | (none) | 6* |
| C | 5 | 5 | MEM20 | 4th | 4 |
| A | 6 | 6 | MEM21 | (none) | 5 |
* The 6th-axis position of the MPG handwheel can be used to move the U servo
motor only if the axis-slaving function is turned off (Parameter 64 = 0).
This should only be done with the X servo, U servo, or both uncoupled from
the bridge.
![]()